Showing posts with label ACW. Show all posts

Tuesday, 8 March 2011

146th New York Zouaves


This unit is the146th New York Zouaves from the ACW. The uniform was obviously based on the French 'Turcos' uniform and these chaps surely must had stood out on the battlefield. This completes the Zouaves from the Perry plastic box.

I have just finished putting 31 lots of SYW French onto eBay. I'd love them to go to one home but I don't imagine that that will happen but please have a look. All have been painted by yours truly and took a very long time to complete. The first item number is 110658890827
. Thanks for looking.

Friday, 25 February 2011

1st Louisiana Zouaves


These are new plastic Zouaves from the Perrys and they are both lovely figures (a lot better than the first box of ACW infantry they produced some time back which in itself was pretty good too) and easy to paint. The detailing of the faces is particularly good. I could not resist getting one box and the remaining battalion will be the 146th NY Zouaves. I'm working on them at the moment.

Sunday, 30 May 2010

Battle of Preston (re-fight)


This weekend saw the ‘proper’ battle of Preston take place, as opposed to the try-out we had a few weeks ago which was posted here on this blog.

Commanding the Confederates, in the role of McLaws, was Ian and commanding the Union, in the role of Howard, was Stephane. I was in my customary spot on the computer as we used Carnage and Glory II, ACW version.

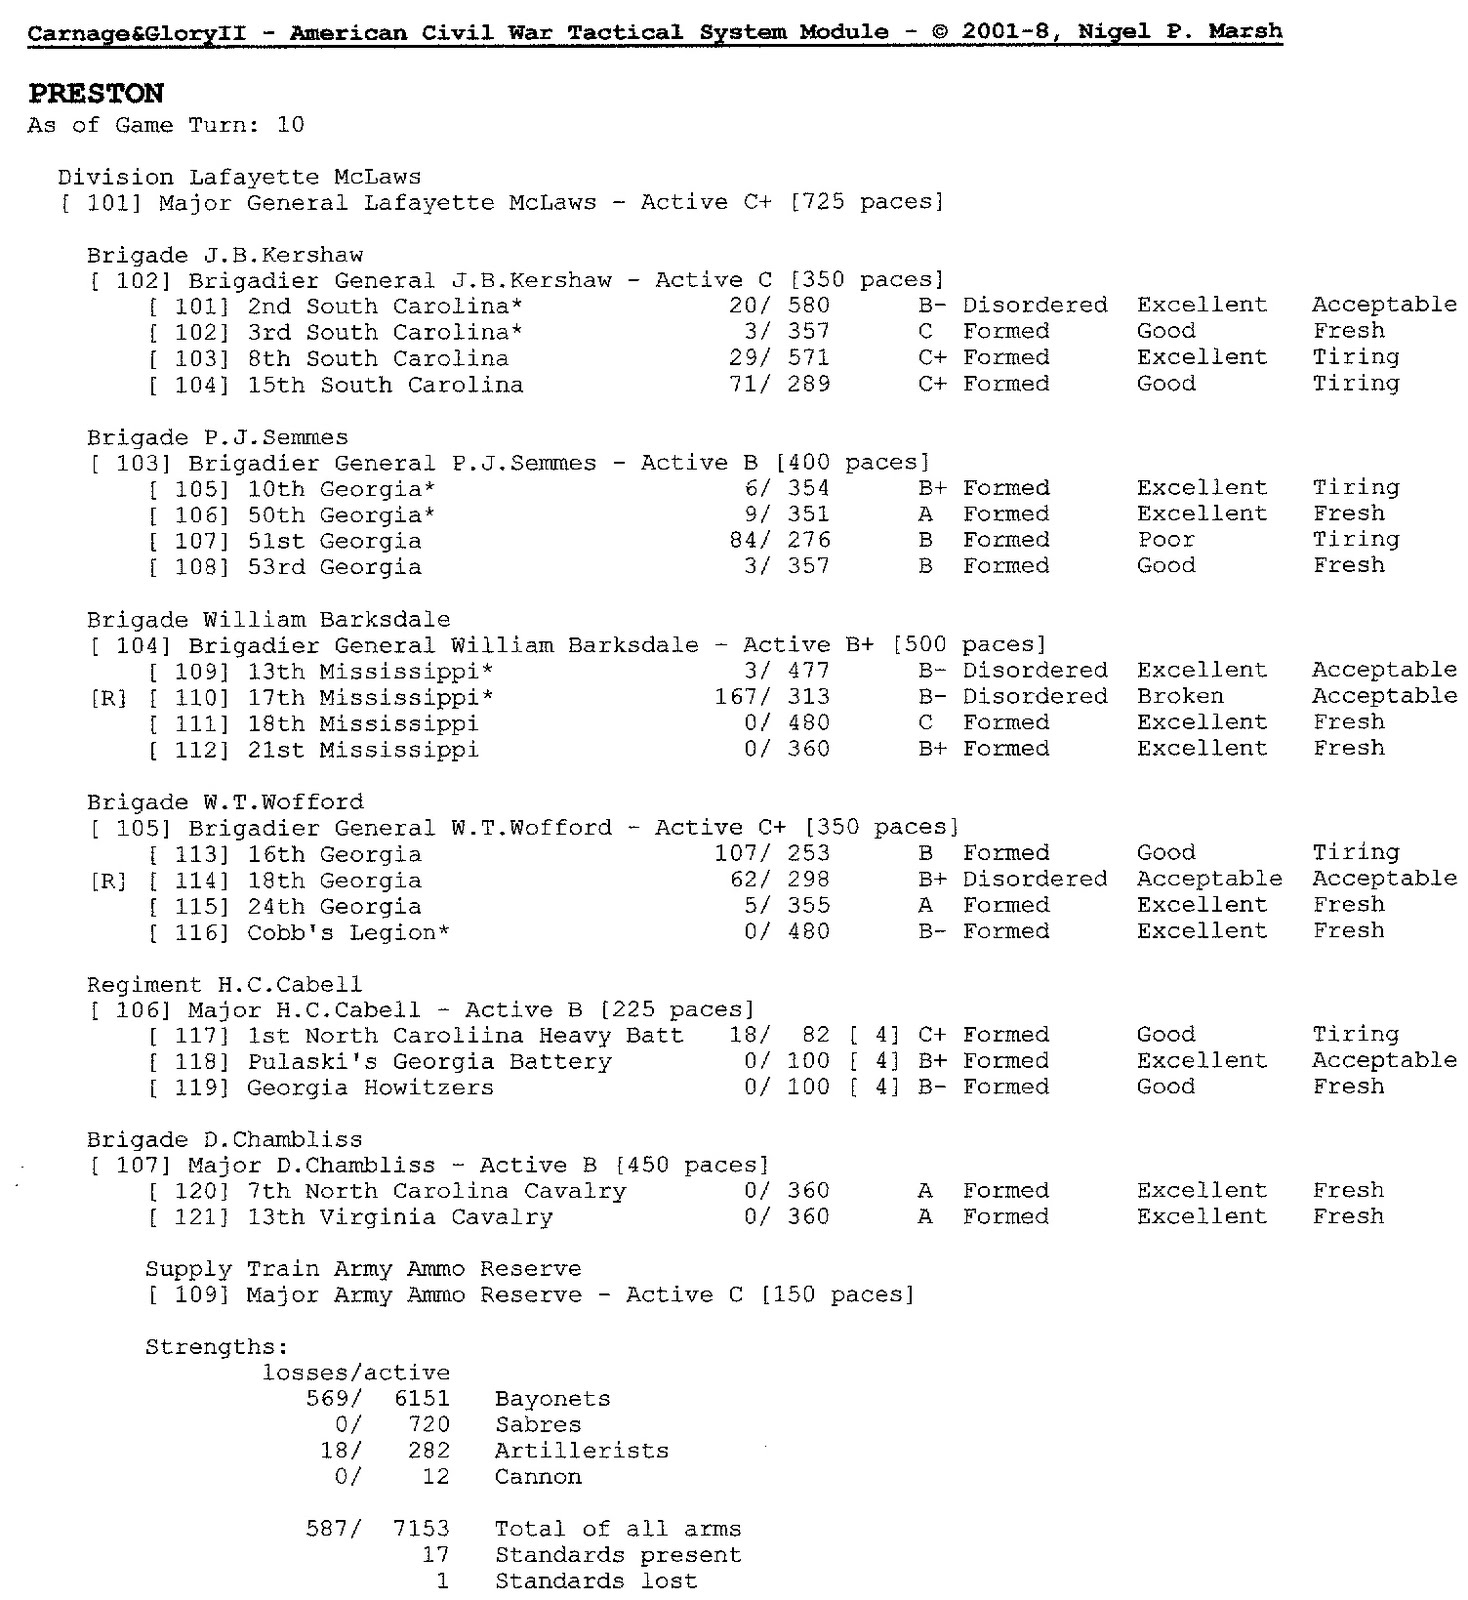
If you read the previous run-through of this battle, you will recall that the Confederates had a bad time of it, although the losses on both sides were small. This time the result was the complete opposite – the Union forces were thrashed (I can think of no other word to convey the hideous distortion in casualties) and in full retreat, their tails between their legs, they fled the field. Union total casualties came in at 35% (including wounded and those who surrendered) of the about 11,000 that started, as against Confederate losses of under 600 in their force of about 7000. I have attached OOBs for both forces up to the last move we played (move 10) as well as a summary.

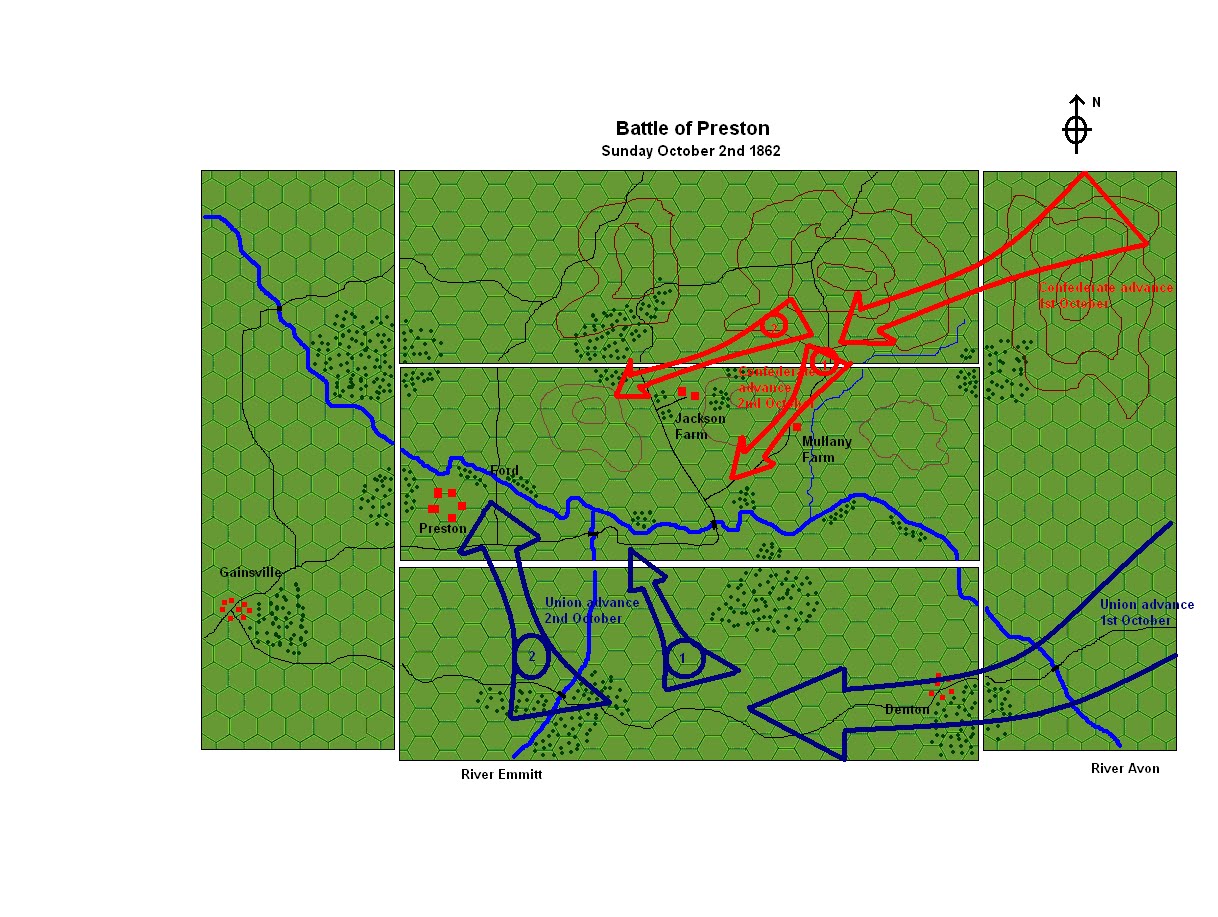
The day started well for Howard as he had found an extra bridge (a Rebel pontoon bridge) and he was allowed to place this wherever he wanted. He was also able to move onto the table Move 1 whereas the rebels had to wait until the following move. As the Umpire (me) had indicated to Howard that he had to act aggressively (which was within the context of the scenario being played) he brought his three infantry divisions over each respective bridge and ford and launched them piece meal against the Rebels. Furthermore, and most crucially, his artillery trailed along at the rear and he did not wait for them to arrive to support the attacks of the infantry. The Union artillery, which was stronger than the Rebel equivalent arm, therefore never fired once. Three divisions launched largely suicidal attacks against the Rebels who had occupied Mullany farm, Jackson farm and the large hill between the two farms (see map).

Some highlights on interest:
1) The valiant but futile assault of 6th Vermont against a rebel battery. They halted at 50 paces and exchanged volleys, on the one hand, for canister on the other. Then, when exhorted to charge, the valiant Vermont boys stood around in chaos for 15 minutes before routing.
2) The successful charge of 2nd Vermont against 16th Georgia in a cornfield. With limited visibility both charged at 15 paces and the Georgians were tumbled out of the field.
3) The irritation of the Union cavalry when, having been ordered to dismount, were then ordered to remount and charge a Rebel battalion. The 9th New York cavalry then routed.
4) The bloody assaults of Barlow’s division on Jackson farm when, on three occasions, the Union charged and on three occasions they were bloodily repulsed.

All in all, a most enjoyable game which ran with great fluidity. We managed 10 moves (or 2 and a half hours) in a day and reached a conclusion by Saturday night. We are planning another game soon (perhaps with more players) and I’d recommend Carnage and Glory II to all ACW gamers.

NB: Yes, I see the picture numbering went slightly wrong! Please forgive me – you know you will feel better for it!

Oh, and I see Stephane has just done his own description of the battle from the Union point of view on his blog. It is in French but if you don't read French put it through a transator as it is very amusing and has quite another point of view, not to mention some lovely pictures.
http://carpatland.blogspot.com/2010/05/la-bataille-de-preston-2-octobre-1862.html

Wednesday, 12 May 2010

Run-through of Preston


The point of today’s exercise was to run through the new rules (Carnage & Glory II’s ACW computer set) and to familiarise us with it’s workings before the actual game on the 29th and 30th of this month.

Ian took the role of the Union and I commanded the Confederates. Normally I would not have a command being attached to the computer imputing ranges etc and controlling the pace (such is my metier), but for the purpose of getting to know how things work I needed to actually command troops. We played 9 moves in about 3 hours and called it quits before the Confederate assault had even begun. The computer declared it a minor Union victory and the casualties reflected this – about 300 Rebels to 100 Union.

The main error on my part was to change initial ‘Attack’ orders to ‘Defend’ for the two leading brigades – on the assumption that I would wait for the rest to arrive and then be able to change those on Defend to Attack so all four brigades would attack together. Big mistake as both Kershaw and Semmes never moved again. Had we played on I might have had better results at getting these Generals to move (what part of “Immediately attack the enemy to your front” do you not understand?) but meanwhile a Union battery, the 1st Ohio Lights, was playing merry hell with the 50th Georgia which, after taking sustained fire for 30 minutes, retired from the field with almost 50% casualties. Additionally, the Union forces had taken the time to line up a strong front line, behind fences, awaiting the Confederates to get their act together. Had the rebels attacked this line I think they’d have been slaughtered. Some greater subtlety is required on the part of the Rebel commander, Mclaws, I think.

The only bright point in an otherwise gloomy Rebel day was the brilliant success of the 7th North Carolina Cavalry which, with sabre only, dispatched into retirement two Union cavalry regiments.

We have both learned quite a bit from this run-through and on the day, in about two week’s time, Ian will command the Rebels and my two French friends, Seb and Steph, will command the Union. Good luck boys!

(See my previous posts for the map etc)

Sunday, 2 May 2010

ACW: 1862 Battle of Preston


ACW: Battle of Preston (2nd October 1862)(Fictional encounter)

Pre-Battle background.


McClellan and Lee fought at the Battle of Antietam near Sharpsburg, Maryland, on September 17, 1862, the bloodiest single day in United States military history. Lee's army, checked at last, returned to Virginia before McClellan could destroy it.

Trailing along at the rear of the Confederate Army was McLaws Division of Longstreet’s Corps. McLaws has had his scouts out and they had assured him that the Union army was not pursuing and with this in mind he allowed his troops to amble along at a gentle pace and had instructed the regimental bands to strike up an assortment of merry tunes. Meanwhile Major General Howard, commanding Union XI Corps had decided,after he had news from his scouts, to interpret his orders from McClellan in a rather aggresive manner. He saw the posibility of trapping the Confederate rearguard before they were able to cross the river Avon.

Early in the morning of Sunday 2nd, Howard received news that the rest of Longstreet’s Corps was at Gainsville. He had planned on deploying on the south side of the Avon and to force McLaws into a bloody assault on the bridge and ford at Preston. Howard now decided that the risk of himself being trapped prevented this deployment and he ordered a deployment to the north of the river. He plans to attack.

---------------------------------------------------------------------------------

Union Corps of three divisions of infantry, 3 batteries and an attached cavalry brigade, totalling 10,560 men.
Confederate Division of four brigades of infantry, 3 batteries and an attached cavalry brigade, totalling 7,440 men.

The Union must deploy their infantry and artillery on the two arrows but in any order of arrival they wish, except that artillery may not lead at the front of an arrow. The cavalry positioning will be a secret.

The Confederates must deploy their infantry and artillery on the two arrows but in any order of arrival they wish, except that artillery may not lead at the front of an arrow. The cavalry option remains a secret.

We plan a run through of the battle, to familiarize ourselves with the rules (Carnage and Glory II) on 12th May and the full battle will be played out on 29/30th May. A full report, with pictures, will follow.

Sunday, 17 January 2010

ACW: Grant's Vermont Brigade


Back on the ACW. To update things as they stand now, the Confederates are done and 5 out of 6 Union infantry brigades are now finished. All I have left to do are three more Union battalions and a couple of batteries of artillery. Then we should be ready for our Spring game and a try out of Carnage and Glory II's ACW computer rules.

The brigade pictured above consists of veteran Vermont battalions. The figures are mostly Perry plastics but with the occasional Dixon metal thrown in - standard bearers and drummers.

I really like the way I have managed to curl the flags and I have found that the best way to do this is as soon as they are stuck together and put on the poles. I use Bâton de colle (or just Pritt Stick in English) to stick the flag on, then immediately curl the flag with my fingers until it looks right. Then set it aside to dry. Once dry, I paint the white line around the flag (where the two sheets have met) and put a drop of Superglue to make sure the flag will stay in position. I will need to go back and rework some of the flags I have in other armies.

Next post will show some Gallic cavalry.

Saturday, 14 November 2009

Renegade's 25mm (or 30mm) ACW


Renegade Miniature are offering some brilliantly cheap deals at the moment - 25mm metal figures for £0.49p each which is only slightly more expensive than Perry's plastics (£0.42p each). Its a long time since metal 25mm figures were this cheap and on average most metals cost at least £1 each, or in the case of Foundry, around £2 each. But you need to buy Renegade's Regiment deals and, as you will see, there is a sting in the tail.

Firstly, the figures. These are the top two photographs. Nice and crisp castings and very easy to paint. I painted this battalion in about four hours. The mouldings for the command are less crisp than the rank and file and need a little work (perhaps the moulds themselves from which the figures come are ageing) but otherwise very nice figures. I bought three "Regiments" of 24 figures but because I want four battalions of 16 I also bought a bag of the command ACW8 (see lower picture).

Therein lies the problem. Note the number of standard bearers (2), officers (4) and drummers (2) in this bag of eight figures. When you buy a Regimental bag you get 20 rank and file and four command, which I expected to be one officer, two standard bearers and a drummer. But no, you get two officers, one standard bearer and one drummer. Fine for Confederates, who normally carried only one flag, but not for the Union, who normally carried two. So I will need to find standard bearers from somewhere else.

Lastly, please look at the third picture - size comparison. Sash and Saber and Perry's look fairly similar in size but Renegade are massive. 30mm to the brow of the head. As they are probably not mixeable together, I will keep all these Renegade figures together in the same brigade.

If I was starting all over again (and I certainly am not) I would be tempted to buy all my figures from this company as these bargain prices won't be around for too long.

Friday, 30 October 2009

More 25mm ACW Hovel's buildings and fieldworks(2)


This now completes the buildings I need for my ACW battlefield.

The top three pictures show more buildings from the Hovel’s range.

The church I bought a few years ago when I started a project of 40mm AWI and I bought it on eBay – it is a Plasticville 'O' gauge Church that is closer to 40mm but still looks good for 25mm.

The remaining pictures show Hovel’s field fortifications which will, of course, be useful for many periods. They sell single rows of gabions, corner gun emplacements and ‘centre’gun emplacements, all of which can be used in any combination to make redoubts or fleches.

Back to painting figures next week.

Sunday, 25 October 2009

Hovel's 25mm ACW Buildings (1)


While I was at SELWG last Sunday I purchased from Hovels a number of ACW 25mm buildings for my table. I've started painting these up and I'm now showing the first four. They are resin and I've put the manufacturer's code on each picture. They are very nice and substantial and, I think, paint up well.

I've added some chopped-down toothpicks in place of the supplied railings as I prefer the thinner look. They were all given a black wash, then dry brushed and finished off with a coat of Army Painter. I like the finished result which gives a very weather look. Next week I'll post pictures of the remainder of the buildings I bought and then for the rest of the year will be focused on the last touches to my ACW armies.

I may digress for a week or so painting up some Eagle Miniatures French SYW I also bought at SELWG. Size-wise these look like they might be compatible with Foundry/Front Rank/Crusader but we will see. I'm not one hundred percent convinced by the raw metal figures but the painted results might just work.